
What is Screen Print Process
You’ve got a killer logo, an eye for trends, and big plans for your custom cosmetic bags—but the screen printing process? That part’s a little murky. And truth be told, when you’re staring down a bulk order with tight timelines and even tighter brand standards, blurry prints and off-brand colors aren’t just frustrating—they’re deal breakers.
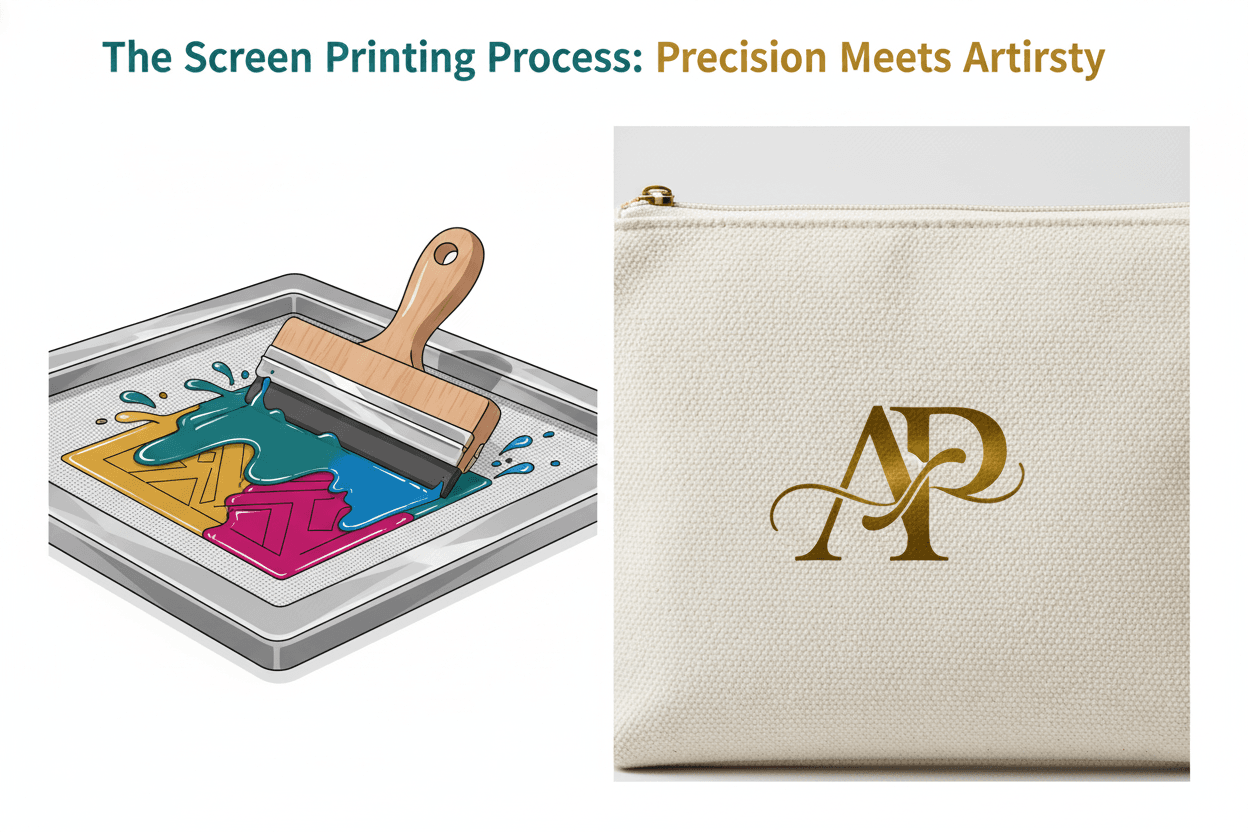
Screen printing isn’t some back-alley hobby with messy ink spills and guesswork squeegees. It’s precision meets artistry at scale—Pantone-matched hues gliding onto vegan leather or waxed canvas like butter on hot toast. When done right, it makes your branding pop louder than a Sale Day email blast.
At Topfeel, we know what’s on the line: “Every client wants that ‘wow’ moment when their product hits shelves,” says Jessie Lin, our Lead Production Engineer. “Our job is to make sure their vision prints cleanly—every single time.”
Key Points of Screen Print Process:
- Material Matters: Choose between cotton canvas, vegan leather, or waterproof nylon to ensure ink compatibility and durability.
- Mesh & Match: Select the appropriate screen mesh count for crisp detail and accurate Pantone color matching.
- Color Control: Use custom Pantone-matched inks and automated delivery systems to maintain vibrant consistency across bulk orders.
- Pre-Press Precision: Set up artwork dimensions meticulously and pre-condition materials like cotton canvas to reduce ink waste.
- Manual vs Automatic Touch: Opt for manual printing on small runs that need finesse; go automatic for large-scale efficiency without sacrificing quality.
- Curing Counts: Maintain optimal curing temperatures and times to preserve water-resistant linings and print longevity.
- Smart Scaling Tips: Batch artwork templates, pre-load screens, and inspect closures (like magnetic snap) during production of oversized or subscription box-ready prints.
Stages Of The Screen Printing Process
Getting clean, crisp prints on fabric isn’t magic—it’s all about nailing each part of the screen printing process.
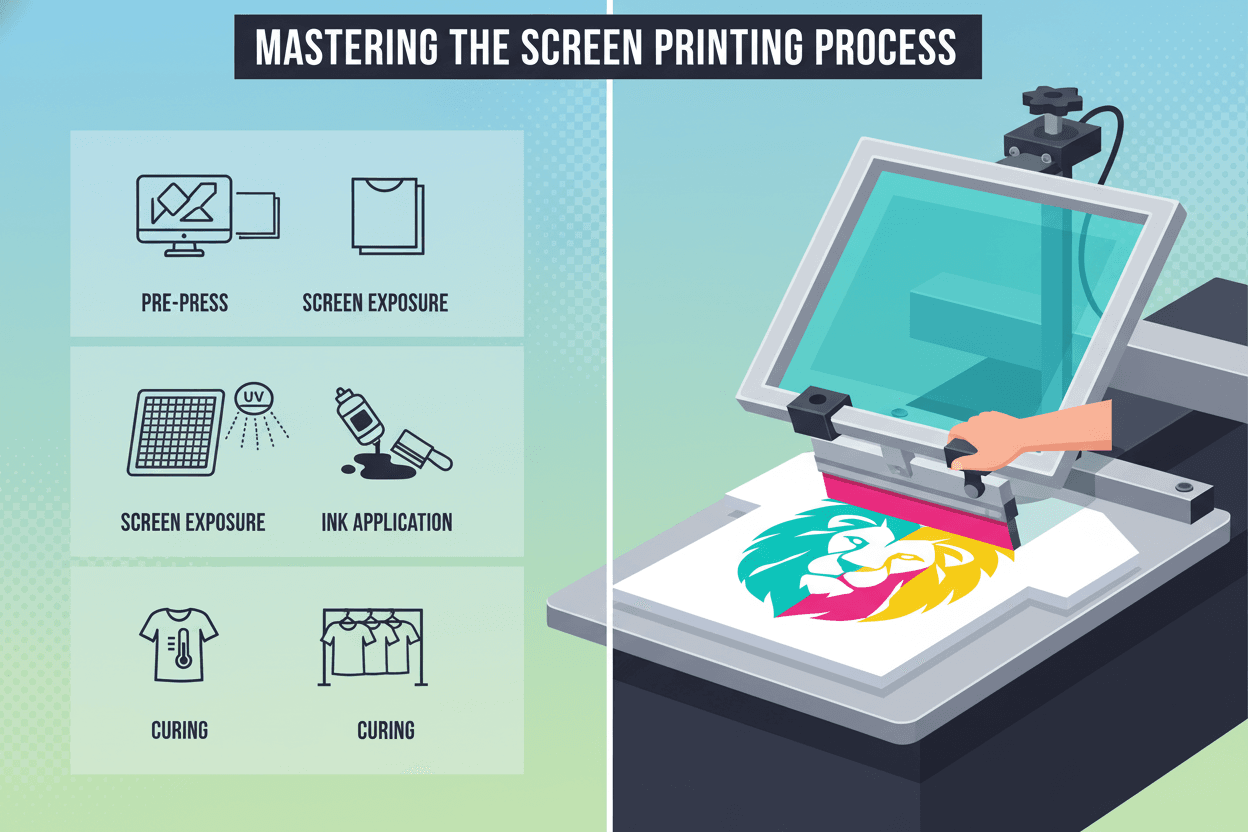
Pre-Press: Material & Design Setup for Cotton Canvas Prints
- Choose tightly woven cotton canvas for sharper image transfer.
- Set artwork resolution to 300 DPI and align dimensions with the frame size.
- Clean the fabric surface thoroughly to avoid dust interfering with ink adhesion.
- Prep your digital design using vector formats like AI or SVG.
- Size it precisely to match your screen size—no stretching later!
- Print on a transparency film using a high-quality inkjet printer.
• Pre-stretch your screens before applying emulsion—this avoids warping mid-print.
Before anything hits the screen, every element from material texture to artwork scale must be locked in tight. Even a slight misalignment can throw off the entire printing process, so don’t skip these steps thinking you’ll fix it later.
Prep work includes multiple moving parts—each one matters:
- Artwork creation: Use scalable vectors and avoid raster images where possible.
- Fabric prepping: Iron out wrinkles and tape edges if needed.
- Frame tensioning: Loose screens = blurry prints.
Screen Exposure Step by Step: From Recycled Polyester Mesh to Clear PVC
Using recycled mesh doesn’t just save waste—it also holds up better over time, especially when paired with clear PVC stencils for sharp detail registration.
Coat your screen evenly with photo emulsion in a dark room—light ruins it fast!
- Let it dry horizontally overnight away from UV exposure.
- Place your transparency film flush against the coated screen, then clamp everything down tight under glass or acrylic sheet.
- Expose under UV light for 10–12 minutes depending on emulsion type and bulb wattage.
✦ Rinse gently but thoroughly after exposure until clear areas wash out completely.
Each step here is about precision and patience—not speed runs. The combination of recycled polyester mesh and transparent PVC allows for detailed image transfer, even on fine-line logos or gradients that would otherwise bleed through lower-quality materials.
Ink Application Essentials: Screen Printing Logos & Custom Pantone Matching
Get those colors poppin’ right by mastering both technique and chemistry in this phase of the screen printing process.
Multiple elements work together here:
- Ink selection: Water-based inks are great for soft feel; plastisol gives bold opacity.
- Squeegee angle & pressure: Consistency matters more than strength.
- Pantone matching system (PMS): Mix exact tones using calibrated scales—not eyeballs! (see Pantone-matched inks)
Short bursts of info to keep things real:
• Always flood the screen before each pull—it primes the stencil evenly.
• Stir ink well before pouring; separation leads to patchy color delivery.
• Align multi-color jobs using registration marks—don’t wing it!
Pantone precision means dialing in hues that match brand identity exactly—and no, close enough isn’t good enough when you’re printing logos for clients who know their hex codes by heart.
Curing and Post-Press Checks: Ensuring Water-Resistant Lining Quality
Here’s where heat meets hustle—the curing stage locks everything into place so your print survives more than one wash cycle without flaking off like week-old paint chips.
Multi-part checklist:
- Set conveyor dryer temp between 320°F–330°F depending on ink type (time + temp both matter; see ink curing tips).
- Run test swatches through first; adjust belt speed as needed.
- Use a laser thermometer or heat gun to confirm full cure across all zones.
- Check final print by stretch-testing edges and doing a wash test if possible.
Grouped essentials:
🞄 Proper curing ensures water resistance stays intact even after multiple washes
🞄 A failed cure often shows up as cracking or fading within days—not weeks
Once cured, inspect every print manually—yes, every single one—for quality control issues like ghosting, smudges, or uneven layering caused during earlier stages of the screen preparation or application phases.
In short? If you’ve done everything right up till now but skip post-cure checks—you’re gambling with customer satisfaction big time… not worth it!
Critical Factors In Screen Printing Process
Let’s break down what really impacts quality and consistency in the screen printing process—from materials to curing, every detail counts.
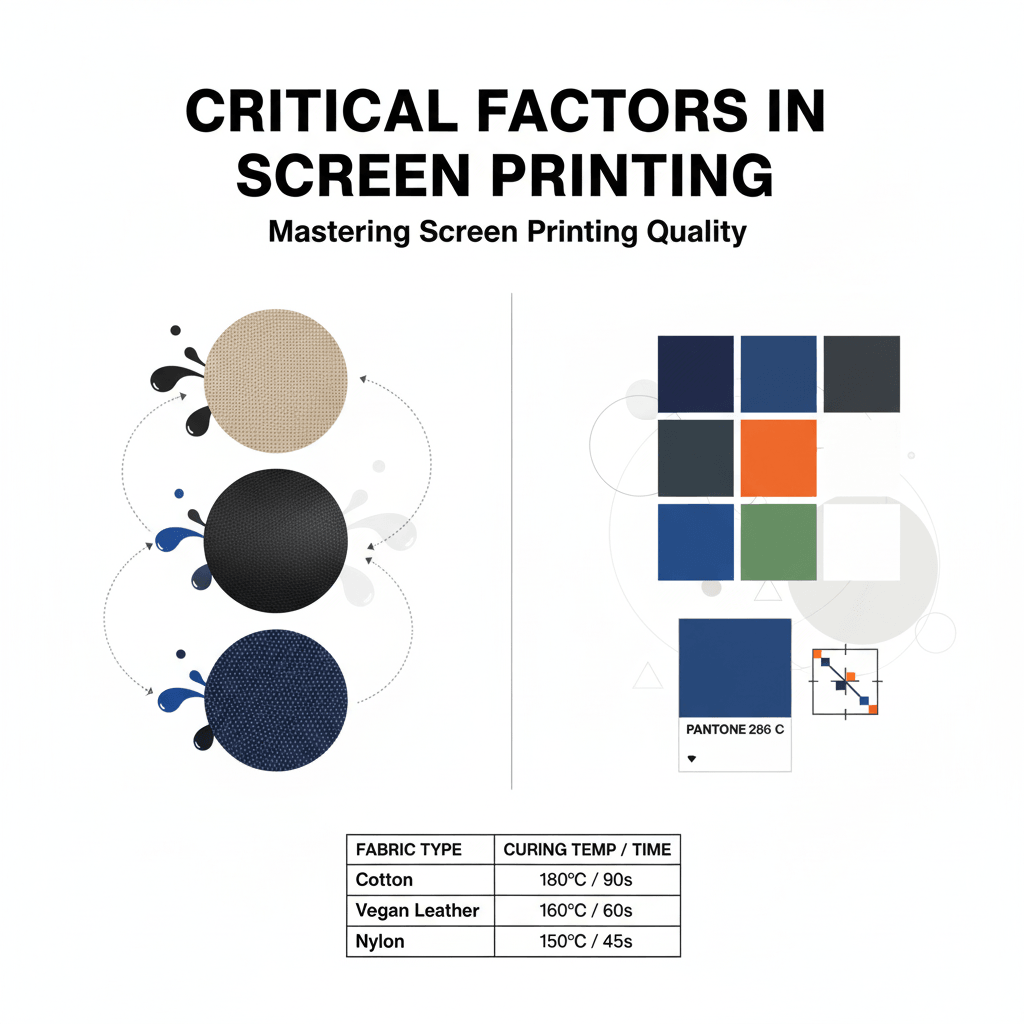
Material Compatibility
✔ Cotton canvas loves water-based inks, but it soaks up fast—ideal for soft textures and matte finishes.
✔ Vegan leather? It’s slicker, needs plastisol or specialty inks to sit right on top without smearing.
✔ Waterproof nylon throws curveballs—it repels ink unless pre-treated or printed with adhesion boosters.
→ Matching your substrate material with the right ink isn’t optional—it’s survival. Skip this step, and prints peel, crack, or ghost after one wash.
Topfeel’s hybrid approach balances softness on cotton with high-opacity results on synthetics—no compromise on vibrancy across surfaces.
Ink & Color Management for Vibrant Color Options
- Start with calibrated color profiles—your monitor lies more than you think.
- Use Pantone-matched inks for brand consistency; don’t eyeball it.
- Stir thoroughly before pouring into the screen; settled pigments = dull colors.
- Test swatches on actual fabric before full runs.
- Adjust viscosity based on print speed and squeegee pressure—thicker isn’t always better.
🎨 “Brands expect 98%+ color accuracy in textile printing,” says a 2024 report from Textile Intelligence Global.
When the ink selection is dialed in, you get bold reds that pop and deep blacks that don’t fade after three washes.
Screen Mesh Count’s Impact on Custom Pantone Matching Accuracy
• Low mesh count (around 110) = thick ink deposit → great for white underbases but poor for fine detail
• Medium mesh (156–200) = solid balance of opacity and detail
• High mesh (230+) = sharpest lines + best Pantone matching accuracy
Grouped by use case:
- Bold graphics: Go low
- Logos + text: Stay mid-range
- Halftones/Pantone precision: Go high
Your screen preparation must match your design goal—or you’re just wasting time re-burning screens when colors bleed or blur out.
Curing Conditions: Temperature, Time, and Water-Resistant Lining Integrity
Tweak these three variables like a mad scientist:
• Temperature too low? Ink stays gooey and rubs off after wear
• Too hot? Say goodbye to your jacket’s waterproof lining—it’ll melt or delaminate
• Time too short? Ink won’t bond; time too long? You scorch the fabric
The trick is syncing all three based on fabric type:
| Fabric Type | Temp (°F) | Time (seconds) | Risk Level |
|---|---|---|---|
| Cotton Canvas | 320 | 45 | Low |
| Vegan Leather | 300 | 35 | Medium |
| Waterproof Nylon | 280 | 30 | High |
Dialing in curing settings protects both your artwork and your gear’s utility. Precision here makes prints last years—not weeks—especially when dealing with water-resistant linings that can easily warp under heat during the curing process.
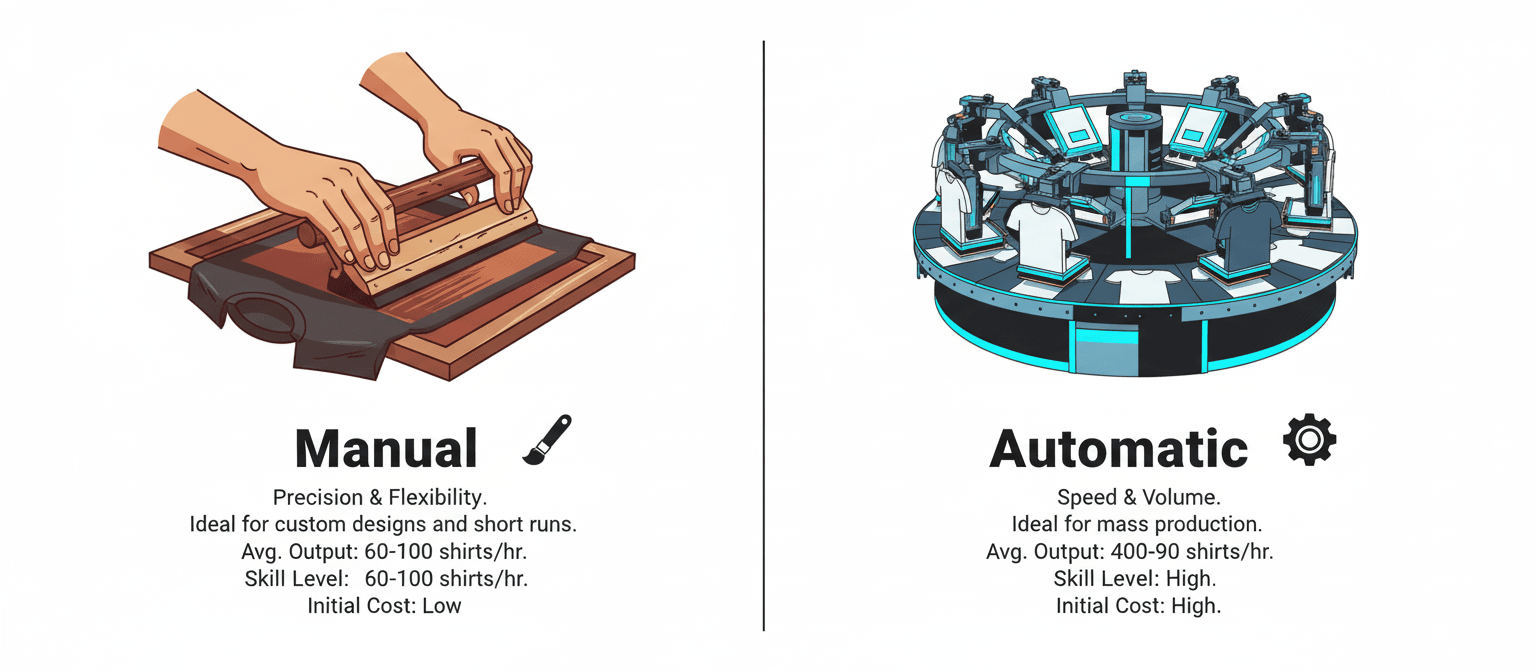
Manual Vs Automatic Screen Printing
A quick look at how manual and automatic methods stack up when it comes to the screen printing process—from control and cost to speed and complexity.
Manual Screen Printing
Hand-powered but high on precision, manual screen printing is all about tactile control. It’s ideal for custom designs and small batches where the human touch still matters.
• Great for intricate artwork that needs nuanced handling
• Lower initial investment in screen printing equipment, perfect for startups
• Allows experimentation with different printing techniques like puff ink or discharge
- A skilled printer can spot flaws mid-print, making real-time adjustments
- Best suited for limited runs—think band merch, boutique fashion, or art prints
- Slower than automated setups but offers superior flexibility
– Labor-intensive, which can drive up unit cost over time
Small print shops often choose this route because of its simplicity and adaptability. According to a 2024 report by PrintTech Global Insights, “Over 62% of boutique apparel brands still rely on manual methods due to their creative flexibility.” This speaks volumes about how artistry still has a seat at the table in today’s tech-driven production world.
Automatic Screen Printing
If you’re all about volume and speed without sacrificing quality, automatic screen printing is your go-to. These machines are built for efficiency across large-scale orders.
• Consistent output with minimal human error thanks to advanced automation systems
• Higher upfront cost but lower long-term labor expenses
• Excellent for bulk runs with fewer design changes
- Load garments → align screens automatically → apply ink uniformly → cure via conveyor dryer
- One operator can manage hundreds of prints per hour compared to dozens manually
- Requires trained staff but not necessarily artisan-level skill—reduces dependency on specialized labor
– ⚙️ Machines handle most of the heavy lifting; operators just fine-tune settings
Here’s a quick comparison table showing key metrics:
| Factor | Manual Printing | Automatic Printing |
|---|---|---|
| Avg Output (shirts/hr) | 60–100 | 400–900 |
| Skill Level Required | High | Moderate |
| Initial Equipment Cost | Low | High |
| Best Use Case | Custom/Short Run | Mass Production |
For businesses scaling up, automatic presses are almost non-negotiable if you want consistent quality and high throughput during each stage of the screen printing process.
Both styles have their place depending on what you’re aiming for—artistic finesse or production muscle—and understanding that choice is key before diving into any investment in screen printing equipment or planning your workflow around specific design complexity levels.
Wasting Ink Optimize Your Screen Printing Process
Ink waste is a silent profit killer. Let’s fix that with smarter canvas prep, ink recycling, and better squeegee control.
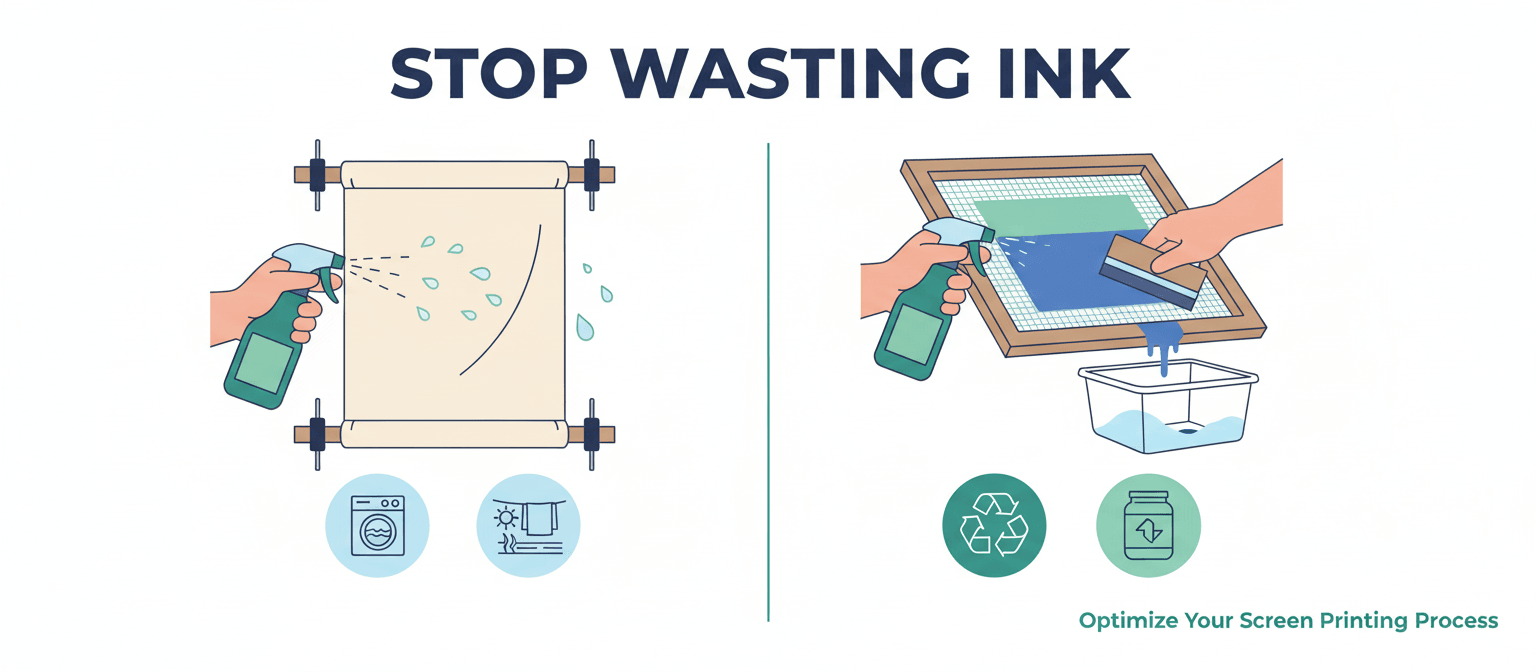
Stop Ink Waste with Pre-Conditioned Cotton Canvas
Prepping your cotton canvas right can dramatically boost ink efficiency during the screen printing process—here’s how to make it count:
• Always wash and dry your canvas before printing to remove sizing agents that soak up excess ink.
• Apply a light mist of water or fabric softener solution before loading onto the press—this reduces unnecessary absorption.
- Use a heat press at low temp to pre-flatten fibers—makes the surface smoother for consistent prints.
- Match your canvas texture with proper screen mesh count; tighter weaves need finer mesh to prevent flooding.
✓ Don’t overlook humidity levels in your print room; high moisture makes cotton greedy for ink.
By reducing pre-print absorption, you keep more pigment on the surface where it belongs—and that means less cleanup and more bang for each bucket.
Recycle Excess Screen Printing Logos Ink Efficiently
Letting leftover logo ink go to waste? That’s just money down the drain. Here’s how to spin it back into gold:
🟢 Sort by Color Family: Group extra inks into compatible shades—reds with reds, blues with blues—for remixing later without muddy tones.
🟢 Use Recovery Tools:
- Scrape unused ink from screens using flexible spatulas.
- Store reclaimed ink in airtight containers labeled by date and color.
- Add flow improvers if ink viscosity thickens over time.
🟢 Blend Smart:
- Combine leftover inks into custom shades for background layers or test runs.
- Track batch blends using digital logs—it helps repeat successful mixes.
🟢 Reduce Future Waste:
- Calibrate your dispensers based on average job size.
- Monitor actual-to-estimated usage weekly so you’re not over-pouring every time.
Recycling doesn’t just save costs—it tightens up your entire screen printing process, making it leaner and greener.
Perfect Your Squeegee Angle for Jumbo Makeup Bag Prints
When you’re working with oversized surfaces like jumbo makeup bags, your squeegee game needs to be on point—or say goodbye to clean lines and hello to blotchy messes.
• Keep a 10°–15° angle when pulling across wide substrates; too steep, and you’ll overload edges; too flat, and you’ll ghost the center print area. (See squeegee angle guidance.)
• Adjust squeegee pressure evenly across strokes—especially crucial when dealing with thicker substrate material like canvas or denim blends.
- Set correct off-contact distance based on bag bulkiness—¼ inch usually works best.
- Choose medium-durometer blades for flexibility without sacrificing control.
- Make sure stencil edges are crisp; inconsistent stencil thickness leads to uneven prints at scale.
Short strokes? Nah—not here! Go full pull across the width in one smooth motion whenever possible—it keeps coverage uniform from zipper edge to base seam.
Dialing in these details won’t just improve quality—it’ll streamline every step of your screen printing workflow while cutting down wasted effort and materials. With Topfeel’s pro-grade gear backing you up, even large-format jobs stay clean, sharp, and cost-effective every time.
Streamline Bulk Orders In Your Screen Printing Process
Tackling large print jobs doesn’t have to feel like herding cats. Here’s how to smooth out every part of your screen printing process for bulk orders.

Batch Artwork Templates for Subscription Box Inclusion
- Standardized layout files save hours when prepping designs
- Color calibration presets ensure consistency across orders
- Template locking protects against accidental edits
Creating reusable templates isn’t just about saving time—it’s about locking down quality. When you’re juggling hundreds of prints, having pre-approved artwork formats helps maintain brand integrity and speeds up decision-making. It also simplifies production planning, especially when you’re working with recurring clients like subscription box companies who expect uniformity across batches. By integrating these templates into your workflow automation, you can cut setup time by over half.
Pre-Load Screens for Oversized Travel & Large Toiletry Runs
Grouped benefits of pre-loading screens:
• Faster turnaround on high-volume toiletry bag runs
• Reduced downtime between shifts or design changes
• Lower labor costs due to minimized manual prep
Pre-loading screens allows your team to hit the ground running—especially important when dealing with bulky travel items that take longer per unit. It also enhances scheduling accuracy within your order management software, ensuring you meet delivery windows without burning out your crew.
Automated Ink Delivery for Vibrant Color Options
Here’s how automated ink systems make life easier:
- Continuous flow prevents color fade during long print runs
- Real-time ink level monitoring avoids mid-job shortages
- Customizable palettes support diverse client branding needs
According to PrintTech Insights Q2 Report, “Automated ink delivery systems reduce material waste by up to 18% while improving color accuracy.” That means fewer reprints and happier clients. Plus, integrating this tech into your existing inventory management setup helps track usage trends over time—making smarter restocking decisions way easier. (Explore automated ink room tools.)
Quality Inspection of Magnetic Snap Closure & Removable Pouches
| Feature | Inspection Method | Common Issues | Resolution Time |
|---|---|---|---|
| Magnetic Snap Closure | Manual tug test | Misalignment | <5 min |
| Removable Pouch Stitching | Visual seam check | Loose threads | <10 min |
| Zipper Functionality | Open/close stress test | Snagging | <7 min |
| Interior Lining Fit | Insert/remove pouch | Bunching or gaps | <6 min |
When it comes to accessories like pouches and closures, customers notice flaws fast. That’s why solid quality control is non-negotiable here. A quick but thorough inspection routine ensures all parts function properly before shipping—and that keeps returns low and reviews high.
By baking these steps into both your daily operations and long-term reporting and analytics, you’re not just fixing issues—you’re learning from them so they don’t pop up again next season.
Bonus: Wrapping Up the Bulk Workflow Like a Pro
Short wins worth remembering:
• Templates = fewer mistakes on repeat jobs
• Pre-loaded screens = faster start times on big items
• Auto ink = better colors without babysitting tanks
• Inspections = fewer complaints post-shipment
And don’t forget—clear updates using smart tools for customer communication go a long way toward keeping clients calm if timelines shift slightly during peak season chaos.
References
- How to Choose the Right Screen Mesh Size – ScreenPrinting.com — https://www.screenprinting.com/pages/screen-printing-mesh-size-information
- Print Technique Guide – Avient Specialty Inks (PDF) — https://www.avientspecialtyinks.com/sites/default/files/2023-12/Print%20Technique%20Guide.pdf
- Wilflex Ink Curing Tips – Avient Specialty Inks (PDF) — https://www.avientspecialtyinks.com/sites/default/files/2020-09/wilflex-ink-curing-tips-2020.pdf
- FlexCure Inks Overview – International Coatings — https://iccink.com/flexcure/
- Titan Automatic Screen Printing Press – Atlas Screen Supply — https://www.atlasscreensupply.com/titan_automatic_press.htm (Atlas Screen Supply)
- Why Choose ROQ for Automatic Screen Printing – ScreenPrinting.com — https://www.screenprinting.com/blogs/news/why-choose-roq-for-automatic-screen-printing
- Rutland Color Mixing Solutions (Pantone®) – Avient Specialty Inks — https://www.avientspecialtyinks.com/products-brand/rutland/rutland-color-mixing-solutions
- Wilflex Brand (Ink-room tools & IMS 3.0) – Avient Specialty Inks — https://www.avientspecialtyinks.com/wilflex-1
FAQs about Screen Printing Process
How does the screen printing process keep brand colors consistent on cosmetic bags?
It’s all in the details. Matching Pantone colors isn’t just a technical step—it’s an art form. The right mesh count ensures crisp lines, while controlled ink flow keeps shades vibrant across every bag. When you’re printing thousands of units, even a slight color shift can throw off your whole brand story.
What materials give the best results for screen printed makeup bags?
- Cotton canvas: Absorbs ink beautifully and holds up over time
- Waterproof nylon: Smooth surface equals sharper prints
- Vegan leather: Sleek finish with eco-conscious appeal
Each one brings its own personality to the table—what matters is choosing what aligns with your product’s vibe and purpose.
Can you reduce ink waste when producing bulk orders through screen printing?
Absolutely—and it starts before any ink hits fabric:
- Pre-treating materials like cotton helps prevent oversaturation
- Reclaim systems catch leftover ink for reuse without compromising quality
- Fine-tuned squeegee angles minimize excess spread on larger surfaces
Small adjustments here save gallons of waste down the line.
Is automatic or manual screen printing better for high-volume subscription box items?
For large batches where consistency reigns supreme, automatic wins hands-down. It delivers clean results at speed—with fewer human errors—even if you’re running 10,000 identical pouches destined for curated gift sets. Manual might add charm in small runs, but automation owns efficiency.
Do different closures affect how logos are applied during screen printing?
Yes—and ignoring that can ruin a great design placement. Zippers and magnetic snaps create uneven surfaces or folds that distort prints if not planned around properly. Smart layout choices ensure your logo stays front-and-center no matter how many compartments or brush holders are involved.


4th-5th Floor, Building B2, Yin Tian Industrial Park, Xi Xiang Road, Bao'an Dist, Shenzhen, 518102 ,China